Java with LabView
Recently, I needed to be able to use parts of our existing code base in LabView, by National Instruments. After some digging, I found that there is no native support for calling Java code from inside LabView itself. A KB article does exist, but leaves a lot to be desired since we are a third party integration company. I like that our code bases is concise, and really do not want to intermingle “fixes” every time a specific need arises. After playing with LabView for a bit (I had never used it prior) I realized that I could call .NET assemblies from within the block diagrams. This opened some doors.
Enter IKVM.NET
I have been aware of a project for a while now, IKVM.NET, but have never needed to use it. IKVM is an implementation of the JVM that runs on the .NET stack. Not all features are supported, Swing being the most notable, but it implements nearly everything that most would need to get an existing library to work in .NET. Feel free to look at how it works in C# using one of our existing Java libraries.
How to do it
All of the screenshots were taken using a project that is hosted over at GitHub. You’ll need GIT to check it out, or just download the source folder. You will also need Maven to compile the binaries/DLL’s. These things are outside the scope of this write-up. You will need a copy of IKVM.NET on the machine that intends to build the project. It can be found at http://www.ikvm.net. I keep my copy of IKVM in c:\opt, so that its readable by everyone. Put it wherever, just remember where you put it!
Maven
Once you have extracted ikvm, you will need to edit your Maven settings.xml file. Add a profile (I called the profile ikvm) that looks like this:
<profiles>
 <profile>
  <id>ikvm</id>
  <properties>
   <ikvm.path>C:/opt/ikvm-7.2.4630.5</ikvm.path>
   <mono.path>C:/Program Files (x86)/Mono-2.10.9/lib/mono/2.0</mono.path>
   <dll.path>${mono.path}</dll.path>
  </properties>
 </profile>
 ...
</profiles>
Notice the property dll.path, it is the location for the standard .NET libraries. I used mono to compile the DLL’s here, but the standard libraries from Microsoft would also work: C:\Windows\Microsoft.NET\Framework\v4.0.30319 Also notice, the version of .NET that you use to build the DLL is the version that will be needed at runtime. IKVM works with .NET 2, so I stick to that for compatibility’s sake. The IKVM maven plugin currently forces us to use MS.NET 4.0 if we use Microsoft’s .NET framework. To make this build play nice with LabView, you may want to install mono to get the ability to compile to .NET 2. Then you need to enable the profile in your Maven settings.
<activeProfiles>
 ...
 <activeProfile>ikvm</activeProfile>
 ...
</activeProfiles>
We have to do this to let the maven plugin know how to call the ikvm compiler. Hopefully, this will get bundled with the plugin at some point, so that no extra configuration will be required.
Building
You can build the project by executing mvn package or mvn install. This will compile all the code in the project, and bundle the proper packages into DLL’s using the IKVM maven plugin (also hosted at GitHub). If there are errors, they are usually pretty descriptive. Try to correct them in your maven settings.
Java with LabView
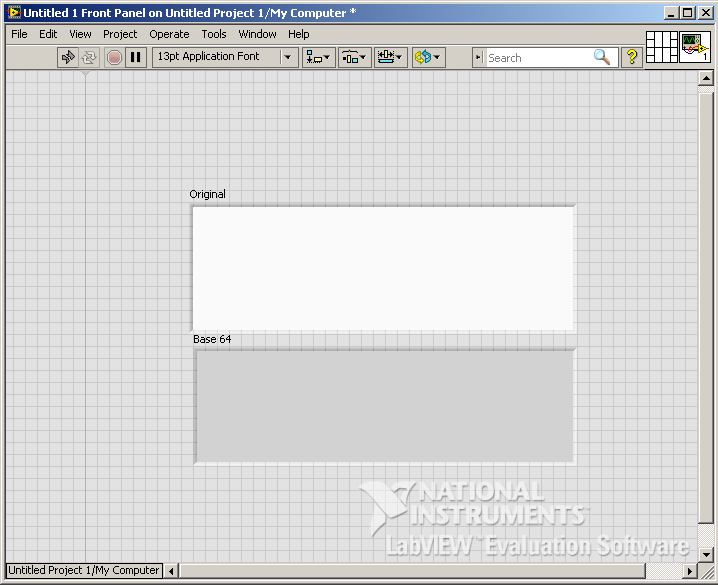
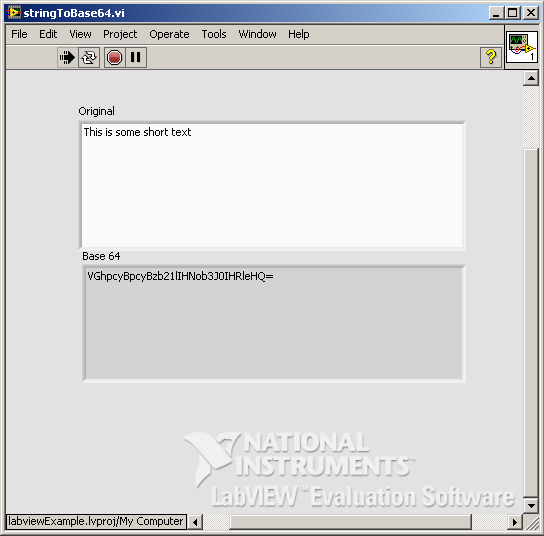
For the LabView portion, we are going to use the DLL generated in the “commons-codec-dll” module. Its located in commons-codec-dll/target. The LabView project is also included in the source code at labview/codecExamples/. I am not a LabView expert, so discount anything that I may do incorrectly in LabView, but I would love any constructive criticism that anyone may have. To start from scratch in LabView, we need to create a project. Then create a VI. In the VI I had only two components, a Text Control and a Text Indicator. The simplest example I thought of was using the Apache Commons Codec library to convert a string to Base64 and outputting it to a text indicator. My front panel looked like this:
Open your block diagram for the VI. You should have blocks that correspond to the text control and text indicator (an input and an output). The goal here is to be able to put some text in the input, and get some text from the output that is a Base64 encoded version of the original text. Since we are using the Commons Codec library, we are forced to use its static methods on the Base64 Class to do this. It would not be very hard at all to create a simple helper method to do this and add that to a DLL as well.
Now we need a block representing the Base64 class. We want to add a .NET invoke node to the block diagram. Its found in Connectivity->.NET->Invoke Node:
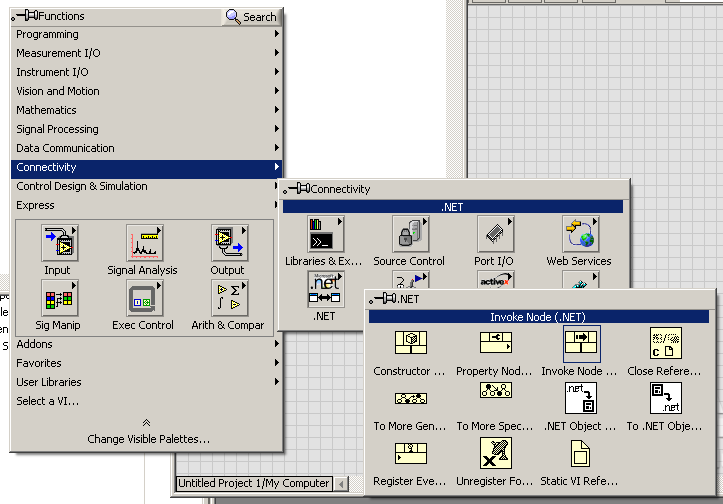
This will add a .NET node to our diagram. We now have to tell the node which class it is supposed to be using. Do this by right clicking on the node, and selecting “Select Class -> .NET -> Browse”. This will bring up a dialog of .NET assemblies that are listed in your Global Assembly Cache (GAC). You will now need to add a reference to the assembly we just created by finding the DLL created in the project you compiled with Maven.
NOTE: Since I am new to LabView, this last step caused some serious head-banging. LabView will initially give you a message stating “An error occurred trying to load the assembly”. This is all it says. LabView does this because it cannot find the references to the IKVM runtime DLL’s. There are a few of ways to fix this.
- Install the IKVM DLL’s to your GAC. I did not do this, because I do not want to rely on my users to have to do this.
- Have a staging directory that contains your DLL, plus the required IKVM DLL’s. LabView searches the GAC then searches the directory your DLL is in. This is what we wound up doing. Our DLL is bundled with the required IKVM DLL’s in a nice lib folder.
- Also add a reference to IKVM.OpenJDK.Core.dll to your project. Do this by simply clicking the browse button once more and finding the correct DLL. Note that this option could leave your end-users without the DLL, and having to locate it on their own as well.
- Copy the required DLLs to the folder containing your labview project. LabView also scans this folder.
Also note, that you may not need all of the IKVM dlls to make your library work. They are split up nicely to allow you ship as little as possible. Use a tool like ilSpy to figure out what references your generated DLL actually needs and only include those.
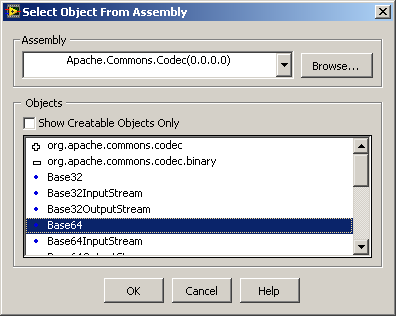
Alright, now that you have added a reference to our Commons-Codec DLL, you can find it in the assemblies list. Once you select it, and no longer get the error, you should see a nice list of the java packages inside of the assembly. We are looking for the Base64 class, so expand the org.apache.commons.codec.binarypackage. Select the Base64 item in the list, and press OK. We now have a Base64 block. Good progress.
Since we are using the Base64 class, we need to select the static method encodeBase64String. Do this by right-clicking the Base64 box and selecting “Select Method”. This gives us a nice list of all the methods we can call on the class. LabView does not know how we are calling the code, so we need to be careful here. It lists all methods. Since we never used a constructor to create a reference to a Base64 object we need to make sure to only call the static methods. They are annotated with “[S]” in the popup list. So we want [S]encodeBase64String. Once you select that we will have a complete Base64 block that we can use in LabView. It should look like this:base64Block
This method returns a String (IKVM makes Java Strings and .NET strings compatible) and takes a byte array (byte[]). If we wanted to simplify this even more, we could have written a small piece of Java code to encapsulate this method call with a String to a String representation, but IKVM provides a helper for this.
We need to add another block to convert our original string (.NET) into a java String and then get its byte array. Add another invoke node. You need to make it use the java.lang.Stringclass, it is located in the IKVM.OpenJDK.Core assembly. If this assembly is not in the list, add it with the browse button. IKVM provides a static instance helper to get a Java byte array object from a .NET string. We need to use this in order to get the byte array. So select the method on the String invoke node, it is called “instancehelper_getBytes”. This new block takes a string as an input and produces a byte array as an output.
At this point, it is just a matter of wiring the proper inputs and outputs to wherever they go, from left to right mine went: Text Control -> instancehelpr_getBytes -> Base64.encodeBase64String -> Text Indicator.
I also had to add an event listener in LabView to wait for a change on the input for this to actually work… Like I said, not a LabView pro. The final diagram looked like this:
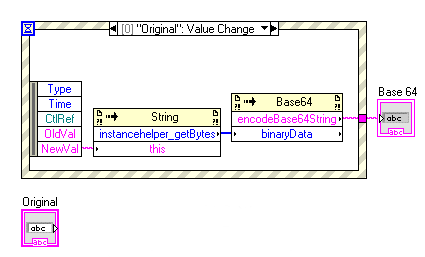
If you add the event listener like I did, you should be able to run the VI and type something into the top text box. I’m not entirely sure how to trigger the event, but once it triggers you will see a Base64 copy of your text appear in the bottom box.
This is a very simple use-case for using your existing Java with LabView. I like using IKVM a lot more than re-designing code that already works, for such a specific use case, especially when the suggested approach is to take away Java’s write once, run anywhere philosophy. This is another good example of “running anywhere”.
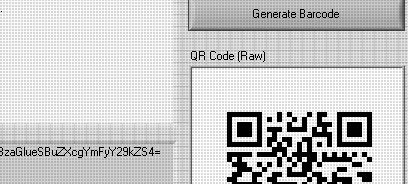
Check out the next post which goes over using this same setup to generate QR Codes within your LabView VI.
All code samples are provided ‘as-is’ and without warranty, of any kind, express or implied, including but not limited to the warranties of merchantability, fitness for a particular purpose and noninfringement. In no event shall the authors or copyright holders be liable for any claim, damages or other liability, whether in an action of contract, tort or otherwise, arising from, out of or in connection with the software or the use or dealings in the software.
Unless otherwise noted, all code samples are provided under the Apache v2 license.